YOU WILL NEED:
* Paint Shop Pro and Animation Shop. I used PSPX but you can make this tag in earlier versions.
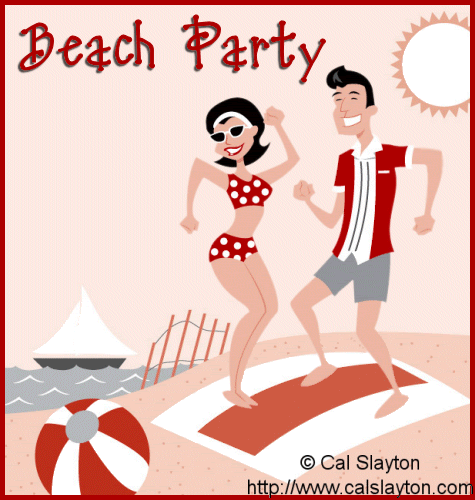
* Beach Party tube and matching image HERE.
* I am using the artwork of Cal Slayton and you can check out his art HERE.
* Font of choice.
* This tutorial uses NO outside filters.
LETS START!
1. Open your tube/image PSP.
2. Activate the Original image layer and copy and paste as a new image.
3. Duplicate this layer and close off the original layer. On the copy, carefully paint the couple out of the background. Click on the colour box in the materials palette and choose the appropriate colour from your background. Change the size of your brush to make it smaller for the fiddly bits. If the towel is too hard then remove it too and let them dance on the sand.


4. When you are satisfied that you have removed the couple from the background, add a new raster layer and floodfill with a dark colour from the image. Select all - Selections - Modify contract by 5 and press delete. Merge to image layer. Duplicate.
5. Close off the two layers you have just done and open the original layer. Copy and paste the couple alone (from your tube) to the canvas. Using the original layer as a guide, position the tube exactly over the couple on the original image. When satisfied with their position, duplicate. Delete the original layer.
6. Using your freehand selection tool, trace around the girl and delete. Activate the other tube layer and Selections - Invert then delete. You should have one layer with the girl and one layer with the boy.
7. Duplicate the girl layer and rename them girl1 and girl2. Duplicate the boy layer and rename them boy1 and boy2.

8. Activate the girl2 layer and mirror image. Position girl2 over girl1 using her feet as a guide to line them up on.

9. Repeat step 8 with the boy2 layer but line him up using the shoulders as a guide.

10. Merge girl1 and boy1 layers together. Repeat with girl2 and boy2 layers. Merge each of these tube layers to one of the background layers you did earlier, being careful not to move the position of the tubes.
11. Resize your canvas and add any text at this point. Use a dark colour from the image.
12. Add copyright information and your watermark and save as an Animation Shop .psp file.
13. Open your file in Animation Shop. Edit - Select all. Animation - Frame Properties - change to 40.
14. Save as a .gif file and you are done. I hope you enjoyed this tutorial.


No comments:
Post a Comment