
YOU WILL NEED:
* Tube of choice - I have used the art of Myka Jelina. You need a license to use her work which you can purchase from CILM
* Accent tube of choice - I used the butterfly picture tube that came with PSP
* Gold pattern tile
* Font of choice
* Eye Candy 4 - Glass (can substitute PSP Inner Bevel)
LETS START!
Set up your supplies ready for use ie you want your gold pattern on the materials palette, install any fonts or plug-ins and restart PSP if necessary. Have your tube open in PSP.
Open a new image 400 x 400. Choose two complimentary colours from your tube and floodfill your canvas with the lighter colour. I used #47406f (dark blue) and #dfedff (light blue). Select all, modify and contract by 6. Selection invert. Open a new raster layer and floodfill the selection with the dark blue colour. While still selected, apply Eye Candy glass at the following settings -

OR

Selection invert again and floodfill with your gold pattern. Selection modify and contract by 2 then press the delete key. Rename this layer Frame.
Activate your background layer. Using your preset shapes tool, select the rectangle. With your foreground set on the dark colour and the background set on the light colour draw a long, thin rectangle using the following settings -

Use your magic wand tool to select the light blue middle of the rectangle and apply the tile effect (Effects - Texture Effects - Tiles) at the following settings -

Duplicate your rectangle so that you now have 5 or 6 rectangles depending on the size you drew it. Space them evenly down your canvas. It may help to turn on your ruler or your guides to ensure that you line them up as straight as possible. Once lined up, close off all layers except for the rectangles and merge visible. Apply drop shadow at the following settings (colour is #000040) -

Make all layers visible. Activate your rectangle layer. Copy your tube and paste as a new layer. Resize and sharpen if necessary. If you want to mirror your tube do it now. Place your tube where you want it and add the same drop shadow as before. Make sure your frame is on top.
Using the same settings as before, draw out three smaller rectangles, each different sizes, each converted to a raster layer. One will be used for your name, one for the copyright information and one for an accent from the tube. You decide where you want to place these things - use my sample tag as a guide.
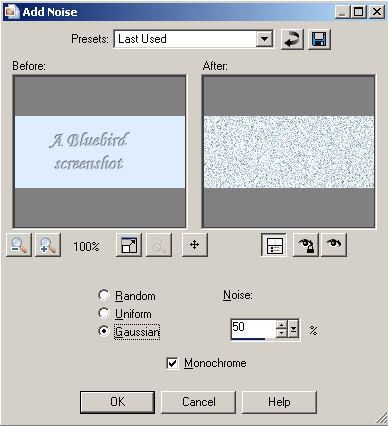
For each rectangle, use the magic wand tool to select the lighter coloured middle section and add noise using the following settings -
Apply the button effect to the rectangle that is going to have the tube accent on it at the following settings (while the middle section is still selected) -

Apply the same drop shadow used previously to each of the three rectangles.
Paste your accent from your tube onto the buttonized rectangle. Merge tube and rectangle together.
Select your text tool and the font you wish to use. Set foreground and background colours to your dark colour. Create your text as a vector so that you can size it to your rectangle. Add the copyright information. Convert text to raster layer and merge text layer to the rectangle.
Add your name to the remaining rectangle. Convert the text to a raster layer, select all, float, defloat and apply the glass or bevel settings we used before. Merge the text layer to the rectangle.
Make sure you are happy with the placement of all the elements of your tag. Add any extra accents you want. When you are happy with the final placement of everything, merge layers and save as a .jpg file. Apply your watermark and you are done.
I hope you enjoyed this tutorial!


No comments:
Post a Comment